
Living style guides are an important tool for web development today, especially in large, complex web applications. They help document styles and patterns, keep designers and developers in sync, and greatly help to organize and distill complex interfaces.
Indeed, living style guides remain one of the best ways to communicate design standards to an organization. Recently, our company went through the process of creating a living style guide. This is the story of how we developed our living style guide, the mistakes we made along the way, and why the current landscape of style guide generators did not suit our needs.
How We Came To Need A Living Style Guide
FamilySearch is a worldwide genealogy site that is built and maintained by multiple teams, each dedicated to a different section of the site. Four years ago we had a site redesign which resulted in a more unified brand. However, after three years the separate teams had created their own unique styles and we realized that the site was no longer unified.
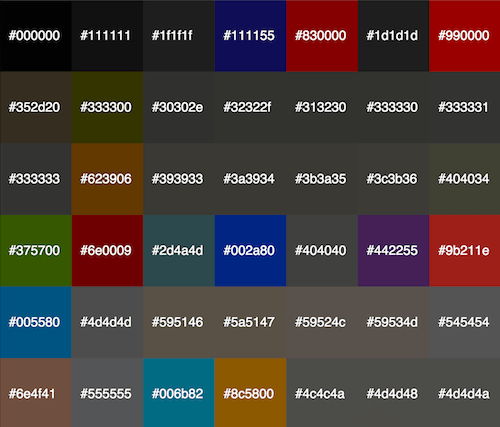
- We had over 200 unique colors across the site. Most colors were very close to each other in hex value. We discovered that this was due to developers using the eyedropper tool to extract the color the designer had used in the mock-up.
- Common styles, such as buttons, were copied from one style sheet to another, or worse, recreated with variations in the same style sheet.
- Styles on a single page were inconsistent with themselves.
- UX patterns were widely different across the site, leading to user confusion.
We decided that it was time for a change. Our current practice was neither sustainable nor scalable. What we needed was a style guide.
Making a style guide wasn’t a new idea. It had been tried and done before – and failed. The result of the last effort was a PDF style guide that was several years out of date and rarely brought up. Most designers and developers didn’t even know it existed. We knew that if we wanted this new style guide to be successful, it had to always be up to date, otherwise it would fail like the last one.
Our Humble Beginnings
I joined FamilySearch as a web developer at the beginning of 2014. After the first month, I began to notice that the section of the site my team worked on had a lot of CSS bloat. We didn’t have a common style sheet that every page used, so any common styles or patterns had to be copied and pasted for every page. A lot of times those styles would contain variations, leading to an inconsistent look even between the common styles.
I began discussing with one of the designers on our team about how we could consolidate all of the inconsistent and common styles into a single style sheet that all of our pages could use. During our free time, we would take inventory of our section of the site, looking for styles or patterns that we could add to our common style sheet. Within a month we had aggregated the most common styles into a single style sheet and released a small style guide just for our section of the site.
Building up to the release, we both made sure to inform the other developers, designers and managers on our team about what we were doing. This facilitated discussions about why a style guide would be helpful and allowed everyone to get behind the project. Thus, when the style guide was released, everyone on the team began using it and we were able to clean up a lot of the CSS bloat in our codebase.
Word spread about what we had done and soon other teams were interested in having a style guide as well. We got in touch with the site’s lead designers to discuss the idea of extending the style guide to the entire site. As it turns out, they had been working on creating a style guide for the marketing team just a few months prior to our effort. We quickly combined our efforts and started working on creating a style guide for the whole site.
Creating The Style Guide
We started by printing off large screen captures of every page of the site and hung them up in a room. This not only served as a great way to see inconsistencies, but also served as a conversation starter as to why a style guide was important. Being able to see all the pages of the site side by side made it extremely easy to see the effects of not having a style guide, which then led to discussions about how a style guide would solve those problems. We encouraged as many people as we could to visit the room and see the problems we were trying to solve.
Once all the pages of the site were printed, we went through each page and identified any inconsistencies in the styles and patterns. We wrote down our findings and put them on sticky notes and attached them to the corresponding page so that we could easily see what and where the inconsistencies were. Using the information from the sticky notes, we were able to gather a list of all common patterns and styles used across the site.

Over the course of six months we consolidated everything into a single unified set. Since we were still using our free time to create the style guide, there would be some weeks where we weren’t able to make any progress.
During that time, we conducted questionnaires with developers and designers to better understand what information both groups would want from a living style guide. From those interviews, we were able to determine what to include and not to include in the style guide.
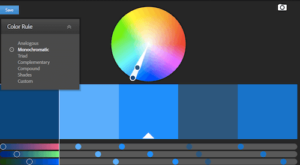
We also had quite a few intense discussions, especially over colors. I’m not joking – I think it took us four months to decide whether or not we should have a color palette, what colors it should consist of, and how you can’t programmatically generate buttons or alert dialogs from a single base color because the end result couldn’t be guaranteed to look right.
At first, the designers felt we shouldn’t enforce a color palette as it would restrict their creativity. However, the more we talked about the importance of unifying our brand colors, the more they realized that we needed one. We settled on defining a set of primary colors and accent colors that designers could use. To help designers not feel too restricted about their color choices, we set a guideline that any of the colors could be lightened by any percentage, giving the designers plenty of room for creativity.
After that discussion, I tried to convince the designers that generating colors programmatically for alerts and buttons would save a lot of time. If I could use a single base color and then lighten or darken it by a set percentage to create border, background and highlight colors, then we could easily create new styles when needed. However, after a lot of discussion, they convinced me that doing so wouldn’t always work. Depending on the base color supplied, the end colors couldn’t be guaranteed to pass contrast ratios or produce an aesthetically pleasing result.
Halfway through the project we released a prototype of the style guide. This allowed interested teams the opportunity to try it out and see how it worked for them. It also helped to show those teams how a style guide would save them time and effort.
At the end of the six months, we were able to release the official FamilySearch Style Guide. We were very excited, but we knew that it wasn’t the end of our work. We needed to get designers and developers to use it.
To do this, we created a Sketch template that used up-to-date styles from the style guide that designers could use to easily create new mock-ups. These mock-ups could then be given to the developers who would use the style guide and information in the mock-up to create the final product.
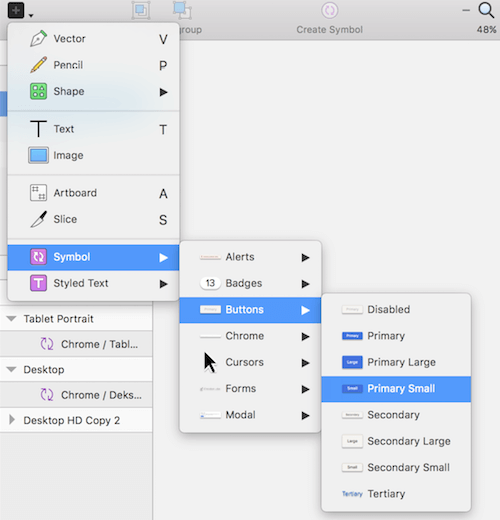
The Sketch template uses predefined Symbols and Styled Text that designers can use in their designs. The Symbols are broken up by pattern (alerts, buttons, etc.) and provide all the available variations of the pattern as well. The Styled Text is broken up by type (headers, paragraphs, lists, etc.) and also provides any variations. The template is maintained by one of the designers and is updated whenever there is a change to the style guide.
With the Sketch template and the style guide, designers were able to focus more on layout and workflow rather than on colors, fonts, and button styles. We worked closely with the designers to ensure that their creativity wasn’t stifled now that they had to follow a style guide. We made sure not to create meticulous rules about how modules and components should be used and instead left it up to the designers’ best judgment. This allowed the designers creative freedom while still being able to have a consistent look and feel in all designs.
Style Guide Architecture
During the six months of development, we also decided on how to organize and present the style guide for both developers and designers to consume. We did a lot of research into different ways to organize large CSS projects and eventually stumbled on Brad Frost’s amazing article discussing the atomic design methodology. We immediately connected with it and knew we wanted to organize our style guide using the principles he discussed.
One thing that we liked about atomic design is how it encouraged creating LEGO-like pieces that would allow us to build on them to create more complex components. We decided to name the stages differently from Brad Frost in order for them to make more sense to our teams. Atoms became elements, molecules became modules, and organisms became components. Brad Frost wrote in his book that renaming the stages is perfectly acceptable since it’s the concept that’s the most important.
“That being said, naming things is hard and imperfect. The names I’ve chosen for the stages of atomic design have worked really well for me and the teams I’ve worked with. But maybe they don’t work for you […] By taking the time to establish an agreed-upon vocabulary, [a] team [is] able to get on board with the concept of atomic design and work together effectively by speaking the same language.” – Brad Frost
After we had agreed on the names of the stages, we organized our directory structure around those names. We created a directory for each of the stages, and then created a file for each of the patterns inside of those stages. This worked well to organize our patterns, but it didn’t leave us a place to store our preprocessor variables and functions. To compensate, we also created a directory we called helpers that anyone could import to gain access to all of our functions and variables.
Once the structure was set up, all that was left was knowing where patterns belonged and what to name them. We created a simple set of rules that would allow us to quickly determine where a pattern should go:
- Elements consist of tag name selectors or single class name selectors that affect a single element. This allowed us to group elements like inputs and buttons together with single class name selectors to create simple things like badges or icons.
- Modules are any pattern that requires more than one HTML element to create. This helped us clearly define the difference between elements, which could only have a single HTML element. Patterns such as alert messages and cards fit well into this stage.
Components were a bit tricker to classify. We first tried to classify them as any pattern which used a module, but we quickly discovered that owing to the building block nature of atomic design, you could easily have a card include an alert message if the card had a form. This didn’t feel right to us since something as simple as a card didn’t feel like it should be component. We then remembered that atomic design classified organisms as relatively complex, distinct sections of an interface. But what would make a clean and simple definition of a distinct section of an interface?
We decided that components should be any pattern which could be represented as any of the HTML5 sectioning elements: ,
,
,
,
,
. This made classifying them easier since we could always refer to how those elements should be used in an HTML page to understand when a pattern was large enough to become a component. Patterns such as a site header and footer or a mobile drawer navigation would cleanly fit into this stage. So far, we haven’t run into a problem with that definition, but we also haven’t created very many components just yet.
css
├─ elements
│ ├─ buttons
│ ├─ forms
│ └─ typography
├─ modules
│ ├─ alerts
│ ├─ cards
│ └─ modals
├─ components
│ ├─ header
│ └─ footer
└─ helpers
  ├─ functions
  ├─ mixins
  └─ variables
An example of our directory structure.
Once we knew how to classify patterns, we could then start creating and naming them. For the most part, naming a pattern was relatively simple, especially in the elements stage, as we just named them what they were (e.g. buttons, forms, alerts). Other patterns we didn’t have a name for and so we looked to what the web called them (e.g. cards).
Some patterns, however, were harder to name since they didn’t have a concrete identity, even on the web. For example, we had to spend a month deciding on the name of the pattern for a mobile drawer navigation. The pattern has many names, such as off-screen navigation, off-canvas navigation, a tray, a drawer, or a slide-in. In the end we had to just sit down and make an executive decision.
What’s nice about having a style guide is that once a pattern has been documented, everyone will start referring to that pattern by the name used in the style guide. So even if someone didn’t agree with the name we chose, they had to use it if they wanted to communicate the pattern to someone else.
The last piece for organizing our style guide was figuring out how to write our CSS selectors. We wanted to create component styles that could be overridden without trying to win the specificity wars. If you’ve ever used Bootstrap and tried to override its base styles, you can understand how annoyingly difficult it can be to override something like .nav > li > a. We discovered BEM CSS, which helped us to write single class name selectors for everything. This allowed developers to override the base styles by just adding their own class and then use a single class name selector of their own.
For example, a card module creates a rectangle with a box shadow and adds padding to the child content. If a developer wanted to remove the padding from the children, all they would have to do is add their own class and use a single class name selector to remove the padding. Because the style guide only uses single class name selectors, the developer’s selector will always override ours.
  Card Title
  This is a card. It has a slight border radius and box shadow to make it stand out from the content.
How BEM CSS makes style overrides simple.
Our Mistakes
Throughout the creation of the style guide, and after its release, we made several mistakes that hindered developers and designers from using or adopting it. Some of the mistakes were easy to fix, others not so much. As the saying goes, “If you’re not making mistakes, then you’re not doing anything.”
Releasing Too Early
One of the earliest mistakes we made was releasing the style guide too early, namely the prototype. Even though it helped to kindle interest and excitement about using a style guide and helped us get our bearings, problems arose when the official style guide was released and teams had to switch off the prototype.
Developers and managers had already invested a lot of time converting their pages to use the initial styles. When they found out that they would have to spend more time to convert to the new styles, they were understandably less than thrilled. We had changed so much from the prototype in both the look and the class names that we essentially made them start from scratch. Not only that, but a full page conversion required a manual page-by-page inspection by both a designer and a developer to ensure that they hadn’t missed anything.
To help remedy the situation, I created an auditing tool that could be run from a bookmarklet to identify and highlight where on the page styles were overriding the style guide. The tool greatly sped up the time it took to convert a page as well as ensured that all of the applicable elements were using the style guide. And since it could be run from a bookmarklet, even the designers could use it and help the conversion process.
I recommend that if you are creating a style guide, don’t release the prototype or an early version that is bound to see major changes. It’s no fun having to do the same work twice and it might hurt your adoption in the end.
Misunderstanding What A Breaking Change Meant For CSS
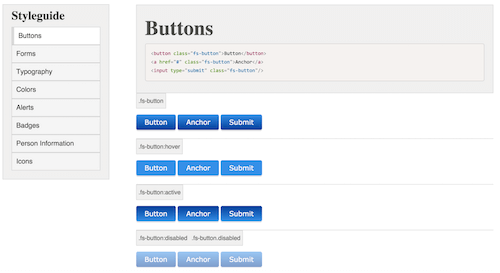
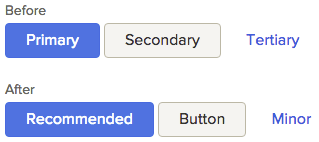
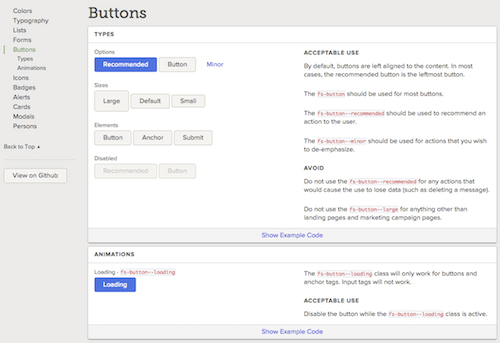
Another mistake we made came after we released the style guide. As we observed how developers and designers used the style guide, we noticed that our button names weren’t well understood. We had used the names “primary button, “secondary button,” and “tertiary button,” but it wasn’t clear as to when they should or should not be used.
We reworked the names and the descriptions to better convey their meaning and ended up with “recommended action button,” “button,” and “minor action button” respectively. These names described the button’s purpose instead of prescribing an order in which to arrange them. This added clarity to when and how each button should be used. However, since we changed the names of the buttons we also had to change the BEM modifier class names used to style the buttons.
Each of the buttons used a modifier class to change the look. A developer would add the base class fs-button to get the basic button styles, and would then add the appropriate modifier class to style the button the way they needed, such as fs-button–tertiary to get the tertiary button look. With the button name change, the modifier name changed with it. So instead of fs-button–tertiary, a developer would need to use fs-button–minor to get the same look.
When it came time to release the change, we flagged the release as non-breaking since it didn’t break the base button styling, only the modifier styling. We thought the change wouldn’t break anything, but we were quite wrong.
Soon after we made the release, we started receiving complaints that we had broken the styles. It turned out that most developers felt that a non-breaking change meant that it was safe to upgrade to a newer version and no code changes would be required. When they made the upgrade and discovered that their buttons looked different and that they would have to change their modifier class names for every button, they weren’t very happy.
After that little incident we made sure that any release which would cause a pattern to look different than before or which would require a class name change would be considered breaking.
Atomic Design Organization
When we adopted the atomic design methodology, we also adopted its way of organizing the style guide by elements, modules, components, templates, and pages. We designed the style guide with multiple pages where each page focused on one of the classifications.
After a while we kept getting asked about where certain styles were documented and kept having to point them to the other pages of the style guide. We soon found out that designers and developers didn’t even know that there was more than just the first page. They were expecting all the styles to be on a single page.
We decided to adhere to everyone’s expectations and moved all the styles onto a single page. Internally we kept the organization of the files the same, but just changed how the style guide presented the information.
Our decision to not strictly adhere to atomic design presentation felt somewhat like we had abandoned what we tried so hard to establish. However, our decision was validated earlier this year when Trent Walton wrote an article about ensuring that conventions work for your team when using atomic design. We realized that it was more important to organize styles where people expected to find them rather than organize them according to the underlying methodology.
Making The Style Guide By Hand
When we first started the style guide, it was a handcrafted HTML page with a lot of duplicate code. Any change to the look had to be applied to every section of the style guide by hand. At first the changes weren’t hard to make, but as the style guide grew, so did the amount of work required to make them. We soon realized that making changes to the style guide was more work than actually creating new styles for it.
Our first attempt at automating the style guide was to create a Handlebars template that used a JSON file that we maintained by hand. Each section of the style guide was generated using a combination of nested objects, strings with HTML, and an associated HTML file that had the example output. For a time this proved much easier to maintain than the single, large HTML page. However, this too was not scalable, and in the end we knew we needed something more automated.
We began looking into style guide generators as a solution to our problems. They promised easier and more automated maintenance for creating living style guides. As we were looking at the different options available to us, we created a list of requirements that a style guide generator had to meet for us to use it.
- Allow us to create a custom structure/template for the style guide. We wanted to be able to define the entire output and not just a small portion.
- If it didn’t allow us to create our own structure, then it had to have the ability to output a JSON object that we could then use for our own template.
- Have a separate code output from the example output. Some of our examples required some additional structure for setup or a completely different structure than what was shown in the example. For instance, showing a modal in a confined area for the style guide required some additional structure and styling since they normally take up the whole screen. We didn’t want to show that in the code output since it wasn’t pertinent to how a developer would normally markup a modal.
- Create a hierarchy of sections and to sort those sections how we wanted.
- Parse comments using Markdown. After having maintained HTML in JSON strings, we knew it would be easier to just write in Markdown.
- Put examples in the comments if we so desired instead of a separate file. Sometimes it’s just easier to see and edit the example right next to the code that it’s for.
- If the style guide generator used tags in comments, we needed the ability to define custom tags for colors and icons.
- If we couldn’t define custom tags, it had to be able to parse any key/value pair tag.
- And lastly, the generator had to still be maintained so we could get help with any issues we had and get them fixed.
- As a bonus, we preferred if the generator was written in JavaScript so if need be we could hack at it to get it to work for our needs.
Note: This table explains how style guide generators met our requirements. All highlighted style guide generators use tag-based comments (and are all based on KSS) and so needed to meet the last two additional requirements. x means it met the requirement, ! means it partially met the requirement.
For custom templates, most of the style guide generators only allowed you to modify the header/footer or how the code was rendered; only one allowed you to pass in your own template.
Building Our Own Style Guide Generator
As we looked at the current landscape of style guide generators, we found that most of them did not meet even half of our requirements. Only one came close, but it still didn’t allow us to create our own template, nor output a JSON object for us to use. After weeks of researching and trying different style guide generators, we came to the conclusion that if we wanted one that did everything we needed, we would have to make it ourselves.
Building your own style guide generator is not new. In fact, it’s been written about twice before on this very site, where the creators of SC5 Styleguide and SourceJS talked about why they did just that. Each of them went through the same process that we did and came to the same conclusion: the current landscape of style guide generators do not meet our needs.
For us, we really wanted the ability to completely customize everything about the generated style guide. We had a custom theme that we wanted to design that would match our branding. Our code examples would start collapsed so the UI wasn’t cluttered with code that designers didn’t care to see (nor developers most of the time). Sometimes our code would be different than the examples, and sometimes we wouldn’t show the code at all.
And so we spent two months and built a style guide generator that could do all of these things.
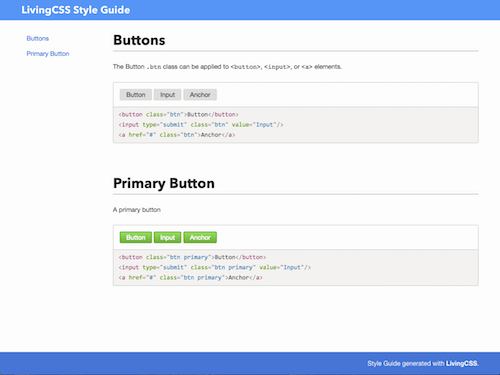
The LivingCSS Style Guide Generator
We built a style guide generator in Node.js that could parse JSDoc-like comments in the styles and use that information to generate a living style guide. We decided to use a tag based system because Markdown alone couldn’t trigger different states for individual sections as easily as a key/value tag could.
/**
 * A short description or lengthy explanation about the style. Will
 * be parsed using `markdown`.
 *
 * @section Section Name
 * @example
 * Example
 */
Example comment block for LivingCSS to parse.
What makes LivingCSS different than other tag-like comment parsers is that it doesn’t try to impose a strict tag ruleset on you. Instead, it defines a few basic tags for you to use, but any tag will be parsed so long as it follows the @tag {type} name - description format (where type, name, and description are all optional). Moreover, if you need special functionality for a tag, you can also define custom tags that can run functions.
Comment descriptions are parsed using Markdown, which combined with tags, meaning you have complete control over how the contents of any given section are rendered. The parsed comments are passed into a Handlebars template which generates the style guide. You can use a custom template if you don’t want to use the default one, which finalizes the ability to customize the style guide for your needs. If you don’t want to use Handlebars, you also have the option to just output a JSON object that can be used as you see fit.
To use LivingCSS, you just pass it a list of files you want to parse that have the appropriate comment markup and the output directory for the generated files. Any additional options can be passed as the last parameter. The final output is a static HTML file that is the living style guide.
In the end, we built what we needed: a flexible style guide generator. If you are looking to build a living style guide using a generator, I recommend you gather your own list of requirements and compare them against the current landscape. Each style guide generator has their strengths and weaknesses, finding the one that works for you is the best thing you can do when automating your style guide.
Maintenance
Now that the style guide is released, we continue to meet weekly to discuss new patterns and if our current patterns sufficiently meet our needs and the needs of our users. We also allow anyone to suggest new patterns or changes to existing patterns, and during our meetings we discuss whether or not to implement the suggestion. This has helped everyone to feel a part of the style guide process and not think of it as something being forced on them that they have no control over.
When a style needs to be changed or added, we typically design it out in Sketch first, especially if we need to analyze the style against different states. Sometimes though, when we are consolidating an inconsistent pattern already used on the site, we just choose one of them to be the official pattern and skip the Sketch design.
We then build the pattern into the style guide, trying to reuse as many previously defined styles and patterns. Then we use LivingCSS to automatically update the style guide with the new pattern. Next, we push the new style guide to our beta environment so developers and designers can test the new styles before they go live into production. We typically push the style guide from beta to production after a month or so to allow ample time for all the teams to do testing. Finally, we update the Sketch template so all new designs will use the latest styles.
Recently we were informed that our users felt that the font on our site was hard to read. We did some digging and decided to improve our typography by using a more legible font, increasing the font size and line height, and implement a baseline grid and modular font scale. We feel really good about our changes and are planning to implement them within the next few months after some user testing.
Because we have a living style guide, a site-wide change to typography will be trivial compared with what it would have taken to get all the teams to update the typography manually by a specific deadline. All we have to do is add the styles to the style guide and everyone will automatically get the updated styles.
Being able to easily update styles across the whole site to improve the user experience is probably one the of greatest benefits of using a living style guide.
Conclusion
Creating a living style guide was a long but worthwhile process. We made a few mistakes along the way that prevented developers and designers from adopting it sooner or using it effectively. However, we pushed through and eventually made it to the end.
Even though it’s released, we still have a long way to go. There are still more styles and patterns that can be added, more pages that need to be converted, and we are planning to expand the style guide to include animations and accessibility guidelines in the near future. We hope you’ve learned some valuable lessons and that what we’ve done proves useful for your own style guides.
Further Reading
(vf, jb, og, ml, il, mrn)